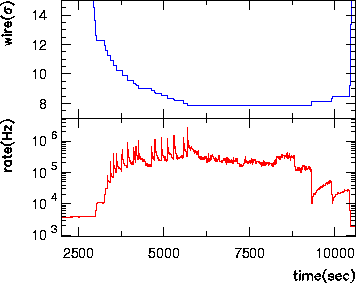
Figure 11: Target distance to the beam center and interaction rate as function of time.

Figure 11: Target distance to the beam center and interaction rate as function
of time.
Fig. 11 shows a typical target scan taken in 1993.
After the target leaves the collimator
shadow at about ![]() the trigger rate suddenly starts to rise.
With each step towards the beam center the target scrapes away a part of the
beam halo. This leads to a sharp rise in the rate which decays then within
a few minutes to a new steady state. At a
distance of about
the trigger rate suddenly starts to rise.
With each step towards the beam center the target scrapes away a part of the
beam halo. This leads to a sharp rise in the rate which decays then within
a few minutes to a new steady state. At a
distance of about ![]() the rate remained at 200-300 kHz for about one
hour. After retracting the target the rate drops suddenly and rises again
until the halo is refilled.
In Fig. 12 the target efficiency
the rate remained at 200-300 kHz for about one
hour. After retracting the target the rate drops suddenly and rises again
until the halo is refilled.
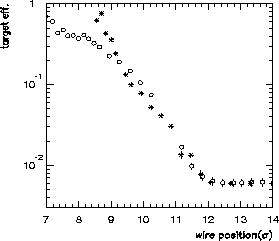
In Fig. 12 the target efficiency ![]() is shown for two different wire scans.
is shown for two different wire scans.
![]() rises after the wire has left the collimator shadow
at
rises after the wire has left the collimator shadow
at ![]() and becomes the dominating absorber if the target is moved
closer to the beam. Efficiencies well above 50% have been reached.
and becomes the dominating absorber if the target is moved
closer to the beam. Efficiencies well above 50% have been reached.

Figure 12: Target efficiency as a function of the distance to the beam center.
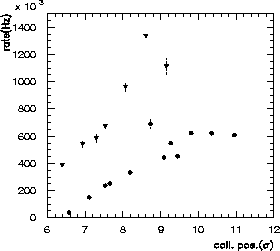
The importance of the collimator position is demonstrated by the measurement shown in Fig. 13. Here the targets are kept at fixed positions and the collimator position is varied.

Figure 13: Interaction rate as a function of the collimator position. The
targets are at fixed positions (dots: ![]() ;
triangles:
;
triangles: ![]() ).
).
The rate and the not plotted target efficiency
![]() rises with the collimator position. At around
rises with the collimator position. At around ![]() the
aperture is limited by other devices, therefore no further
increase is observed.
To achieve high values of
the
aperture is limited by other devices, therefore no further
increase is observed.
To achieve high values of ![]() at least
at least ![]() free aperture
from the target position is required.
free aperture
from the target position is required.